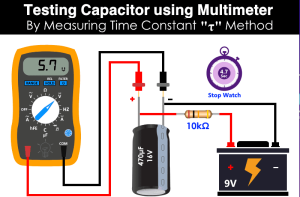
Testing an AC (alternating current) capacitor with a multimeter involves measuring its capacitance and checking for any potential issues like a short circuit or open circuit. Here’s a step-by-step guide on how to test an AC capacitor using a multimeter:
Note: Before proceeding, ensure that the capacitor is fully discharged to avoid any electrical shock.
Materials Needed:
Multimeter (set to capacitance measurement mode)
Safety gloves and goggles (optional but recommended)
Screwdriver or other tool for removing the capacitor (if necessary)
Steps:
Turn Off Power
Make sure the power to the circuit or device containing the capacitor is turned off and disconnected. If you’re testing a capacitor in a motor, air conditioner, or other device, disconnect it from the power source.
Discharge the Capacitor
To ensure safety, discharge the capacitor by shorting its terminals with a screwdriver or other suitable tool. This helps remove any residual charge that may be stored in the capacitor.
Remove the Capacitor (if necessary)
If the capacitor is easily accessible and removable, disconnect it from the circuit or device. This step is not always required, especially if you’re testing capacitors in place.
Set the Multimeter: Turn on the multimeter and set it to the capacitance measurement mode (usually denoted by the symbol “F” or “μF”). Select a suitable range based on the expected capacitance value of the capacitor. If you’re unsure, start with the highest range and work your way down if necessary.
Connect the Leads
Connect the multimeter leads to the terminals of the capacitor. Ensure that the positive lead is connected to the positive terminal of the capacitor and the negative lead to the negative terminal.
Read the Capacitance Value
The multimeter should display the capacitance value of the capacitor. Compare this reading to the capacitor’s rated capacitance. If the measured capacitance is significantly different from the rated value, the capacitor may be faulty and require replacement.
Check for Shorts and Open Circuits
While still connected to the multimeter, check for shorts and open circuits. Switch the multimeter to the resistance (ohms) mode and touch the leads to the capacitor terminals. A low resistance reading (close to zero ohms) indicates a short circuit, while a very high resistance or open circuit reading indicates a potential issue.
Reassemble (if necessary)
If you removed the capacitor for testing, reassemble it back into the circuit or device.
Interpret the Results
Based on the capacitance reading and any indications of shorts or open circuits, you can determine whether the capacitor is in good condition or needs replacement.
Remember that capacitor testing results may also depend on the temperature and other external factors. If you’re unsure about the results or the capacitor’s condition, it’s a good idea to consult a professional or replace the capacitor if necessary.